Install tracking on ads
Set up Facebook ads
Go to your Facebook Ads Manager, and go to Ads tab.
Select all ads using the checkbox in the header and click on Edit ads. This will edit all ads, in bulk
Copy this code fbadid={{ad.id}}&fbadname={{ad.name}} and paste it in the URL parameters field
If you have other parameters, such as utm_campaign={{fb.campaign_name}}&source=facebook , merge them by adding &fbadid={{ad.id}}&fbadname={{ad.name}}
Don’t forget to save the new change
Next, make sure to integrate Facebook if you haven’t done that already!
Set up Google ads
Go to your Google Ads Manager, and go to Ads section.
Click on the Tools icon and click on Scripts ( under Bulk Actions ) and click on the plus icon to create a new script.
Copy the code below and paste in the new script
  function main() {
            var adIterator = AdsApp.ads().get();
                while (adIterator.hasNext()) {
                var ad = adIterator.next();
                var adgroup = ad.getAdGroup().getName().replace(/[^a-zA-Z0-9- ]/g, "");
                var campaign = ad.getCampaign().getName().replace(/[^a-zA-Z0-9- ]/g, "");
                //var adHeadline = ad.getLongHeadline().replace(/[^a-zA-Z0-9- ]/g, "");
                var adID = ad.getId();
                var name = campaign + " " + adgroup+ " " + adID;
                name = name.replace(/\s/g,'-');
                //Logger.log( name );
                ad.getCampaign().urls().setCustomParameters({adname:name});
            }
  }
Don’t forget to name the script, for example “Atlass ad name generator” and click on save. Before navigating, make sure to click run.
Next, go to All campaigns, click on Settings button, then Account settings and open the tracking section.
Copy this code {lpurl}?gadid={creative}&gadname={_adname} and paste it in the Tracking Template field
Don’t forget to save the new change
Now, make sure to set up the Google Ads integration if you haven’t done that already.
Set up TikTok ads
Go to your TikTok Ads Manager, and go to Ads tab.
Select all ads using the checkbox in the header and click on Edit ads. This will edit all ads, in bulk
Add the following parameters to the URL of every add: ttadid=__CID__&ttadname=__CID_NAME__
Don’t forget to save the new change
Now, make sure to set up the TikTok integration, if you haven’t done that already
Set up Email Tracking
Go to your Email Service provider and edit the email templates in use.
Edit the CTA link within the body of the email
Add the tracking parameters to the existing link ?atl_campaign=%email.subject%
First make sure you change the %email.subject% , depending on your ESP.
For MailChimp, use he code below:
( More details here )
For ActiveCampaign, use he code below:
( More details here )
For Drip, use he code below:
For ConvertKit, use the code below:
For Klaviyo, use the code below:
For Aweber, use the code below:
For SendGrid, use the code below:
Don’t forget to save the new change
Install tracking script
Install the script on custom store
Create an if statement for logged in users vs logged out users.
For logged out users, aka visitors, use the code below:
Copy the script below and paste it as high as you can within the HEAD tag ( <head></head> ).
For logged in users, use the code below:
Copy the script below and paste it as high as you can within the HEAD tag ( <head></head> ).
Don’t forget to save the file.
For example, the full code for a store built with PHP would look like:
  <?php if ( user_loggedin() ) { ?>
          	 <script>
                  window.atlassSettings = {
                      APPKEY: "_xxxxxxxxxxxxxxxxxxxxxxxxxxxxxxxx_",
                      tags: 'primary',
                      email: ''
                  }
                  var s = document.createElement("script");
                  s.type = "text/javascript";
                  s.src = "https://theatlass.com/t/t.min.js";
                  document.head.appendChild(s);
              </script>
          <?php } else { ?>
          	 <script>
                  window.atlassSettings = {
                      APPKEY: "_xxxxxxxxxxxxxxxxxxxxxxxxxxxxxxxx_",
                      tags: 'primary',
                  }
                  var s = document.createElement("script");
                  s.type = "text/javascript";
                  s.src = "https://theatlass.com/t/t.min.js";
                  document.head.appendChild(s);
              </script>
          <?php } ?>
Set up integrations
Integration via API
Locate your function that processed the order.
Send a post request to https://atlass-302217.ew.r.appspot.com/order/add containing the JSON code below.
Depending on the programming languange, we set up some examples:
Don’t forget to change the fields with the actual customer data.
Raw JSON
  {
  "APPKEY": "xxxxxxxxxxxxxxxxxxxxxxxxxxxxxxxx", // Organization APPKEY, *required
  "APP_SECRET": "xxxxxxxx-xxxx-xxxx-xxxx-xxxxxxxxxxxx", // Organization SECRET, *required
  "firstname": "John", //Client firstname
  "lastname": "Doe", //Client lastname
  "email": "John@doe.com", //Client email, *required
  "IP": "71.23.54.682", //Client IP
  "orderName": "Order number 215645675733",
  "orderPrice": 349,
  "orderID": 1252653462, //internal ID of the order
  "orderItems": [
    {
        "Name": "Produs test 1" ,
        "Price": 299,
        "Quantity":1
    }
    ...
  ]
}
For PHP, use this code:
  $data = array(
    "APPKEY" => "xxxxxxxxxxxxxxxxxxxxxxxxxxxxxxxx", // Organization APPKEY, *required
    "APP_SECRET" => "xxxxxxxx-xxxx-xxxx-xxxx-xxxxxxxxxxxx", // Organization SECRET, *required
    "firstname" => "John", //Client firstname
    "lastname" => "Doe", //Client lastname
    "email" => "john.doe@gmail.com", //Client email, *required
    "IP" =>  "71.23.54.682", //Client IP
    "orderName" => "Order number 215645675733", //Order name, Purchase name or Product name
    "orderPrice" => 349, //Order price, Purchase price or Product price
    "orderID" => 1252653462, // internal ID of the order
    "orderItems" => array(
        array(
            "Name" => "Item one",
            "Price" => 349,
            "Quantity" => 1
        )
    )
);

$payload = json_encode($data);

// Prepare new cURL resource
$ch = curl_init('https://atlass-302217.ew.r.appspot.com/order/add');
curl_setopt($ch, CURLOPT_RETURNTRANSFER, true);
curl_setopt($ch, CURLINFO_HEADER_OUT, true);
curl_setopt($ch, CURLOPT_POST, true);
curl_setopt($ch, CURLOPT_POSTFIELDS, $payload);

// Set HTTP Header for POST request
curl_setopt($ch, CURLOPT_HTTPHEADER, array(
'Content-Type: application/json',
'Content-Length: ' . strlen($payload))
);

// Submit the POST request
$result = curl_exec($ch);

// Close cURL session handle
curl_close($ch);

var_dump( $result );
Save the page and publish it.
Facebook Integration
The Facebook integration will allow us to calculate and analyze which ad makes the most profits and provides the best return on investment.
Let’s plug it in.
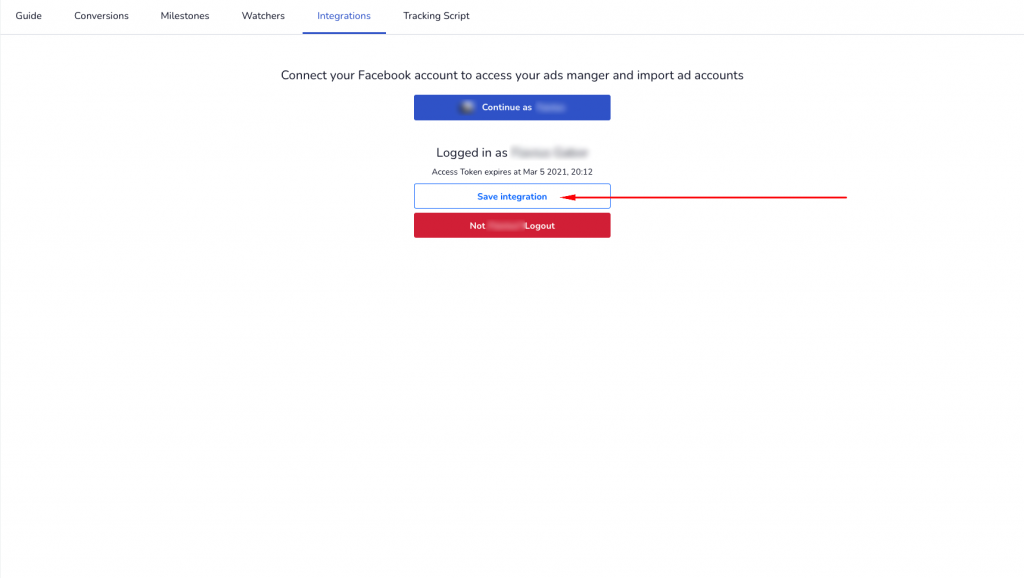
First, go to the Integrations page and click on Facebook then log in with Facebook.
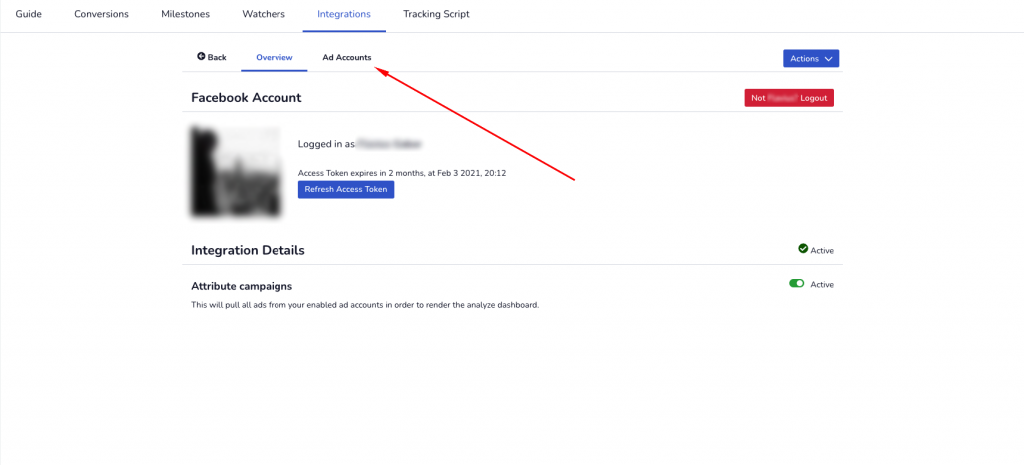
After the Facebook login pop-up window will prompt to allow Atlass access to your account, click the Save Integration button.
After the integration is saved, go to the ad accounts tab.
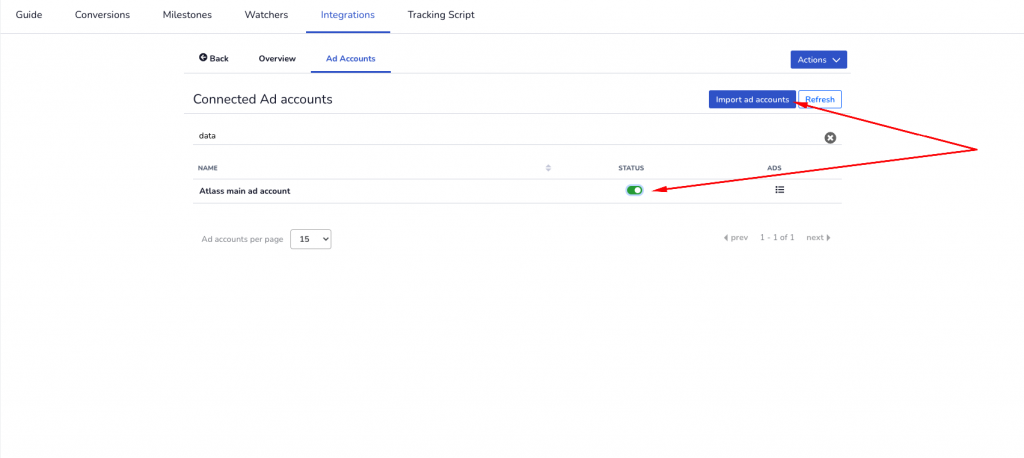
From the Ad Accounts, click the imports button. This action will import all ad accounts owned or managed by you.
After they have been imported, enable the ones you are using the run ads and want to attribute the sales.
Now, make sure to set up tracking parameters for all Facebook ads, if you haven’t done that already.